
Product specific settings for up to 120 different products.
Note: After changing a parameter you are prompted to choose whether you want to change all products or the currently chosen one. Press + and – simultaneously to change all products or OK to change the currently chosen one.
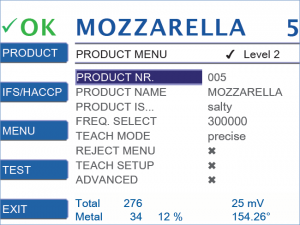
Only level 3 users can access REJECT MENU, TEACH SETUP and ADVANCED. These are explained in separate posts.
PRODUCT NR.
Press +/- to choose the desired product number.
Confirm with OK.
Note: Product 0 is set to neutral and can not be changed.
PRODUCT NAME
Go to PRODUCT NAME
Press OK to edit it.
Press +/- to change the current letter.
Press <> to select the previous/next letter.
Note: You can only use Latin characters.
Confirm the name with OK.
PRODUCT IS…
Go to PRODUCT IS…
Press OK.
Press +/- to choose the characteristic that describes your product:
| dry | Products with little residual moisture like powder and solid products |
| wet | Products with high amount of moisture, but few salt or spice content, e.g. sausages, meat, fruits, vegetables |
| salty | Products with high salt content and good conductivity, e.g. cheese |
| frozen | Deeply frozen products (-18°C/0°F) |
| melting | Deeply frozen products with lightly melted surface |
| alu foil | Products packaged in metalized film |
| plastic | Plastic granulate with graphite |
| vibration | Vibrations in the construction |
| shock | Hard knocks and shocks |
| optimized | All product tolerances are set to x1.0 by default |
| neutral | No product effect. Run the metal detector without TEACH. Set METAL SENSE mV only. For further information refer to: https://docs.cassel-inspection.com/md/howto-signal-threshold-for-neutral-product |
Confirm with OK
FREQ.SELECT
Go to FREQ. SELECT.
Press OK.
Press +/- to select the desired frequency.
Single-Frequency-Sensor: This parameter cannot be changed.
Dual- or Four-Frequency-Sensor and AUTO FREQUENCY set to yes: FREQ. SELECT is determined automatically. You cannot change it.
Dual- or Four-Frequency-Sensor and AUTO FREQUENCY set to no: You can choose between the available sensor frequencies (recommended only for technicians).
Confirm with OK.
TEACH MODE
Go to TEACH MODE
Press OK.
Press +/- to select.
Confirm with OK.
| precise | Recommended mode for: BD / conveyor with a photo sensor before the BD head AND where the products are passing one by one (with a distance more than the sensor head tunnel height. Distance = free gap between two subsequent product packs). 8 to 14 product samples are necessary for the precise teach mode. The result is that the metal detector is almost optimally adjusted to the product and therefore achieves very good results. In most cases you do not have to do an OPTIMIZE. PRODUCT MENU > TEACH SETUP > PRECISE COUNT defines the minimum number of product samples required for this mode. Default = 12 PRODUCT MENU > TEACH SETUP > TEACH TIME s defines the minimum duration that each teach step waits for a product sample. Default = 30 https://docs.cassel-inspection.com/md/teach-setup |
| quick | Recommended mode for: Same as teach mode ‘precise’. 3 to 7 product samples are necessary for the quick teach mode. The product is taught with large tolerance but therefore faster. As a result, the metal detector does not detect with best metal detection performance. We recommend to optimize the sensitivity afterwards using the OPTIMIZE function. PRODUCT MENU > TEACH SETUP > QUICK COUNT defines the minimum number of product samples required for this mode. Default = 8 PRODUCT MENU > TEACH SETUP > TEACH TIME s defines the minimum duration that each teach step waits for a product sample. Default = 30 https://docs.cassel-inspection.com/md/teach-setup |
| time (precise) | Recommended mode for: GF, R / Bulk flow IN LIQUID / pipeline BD / conveyor without photo sensor, for one by one products BD / conveyor without photo sensor, for bulk products BD / conveyor without photo sensor, where product effect is low or zero and teach has failed in teach mode ‘precise’ or ‘quick’. Takes product sample signals based on elapsed time. For a certain period of time all signals, no matter what amplitude, are considered to build the TEACH AREA and set sensitivity and phase. After this time has elapsed the teach process is finished, no matter if actually product has been passed or not. PRODUCT MENU > TEACH SETUP > PRECISE COUNT defines the minimum number of teach steps. One teach step is the duration that it takes for passing through the metal detector tunnel. Default = 12 (GF, R) and 5 (all other) https://docs.cassel-inspection.com/md/teach-setup |
| time (quick) | Recommended mode for: Same as teach mode ‘time (precise)’. Time (quick) works basically the same way as time (precise). Time (quick) takes less product samples and applies larger tolerances. Use this mode only if a short teach time is very important for your process. PRODUCT MENU > TEACH SETUP > QUICK COUNT defines the minimum number of teach steps. One teach step is the duration that it takes for passing through the metal detector tunnel. Default = 8 (GF, R) and 3 (all other) https://docs.cassel-inspection.com/md/teach-setup |
| phase | Recommended mode for: Correct an existing product teach where the phase has drifted away. Determines and sets only the parameter PHASE. All other settings remain same, such as teach area shape, amplification, tolerances. |
| ellipse | Recommended mode for: Teach mode for experts only. It is used for product signals that show irregular and strong amplitudes. This mode creates an TEACH AREA with an ellipse shape. The ellipse only depends on product phase. The ellpise size is pre-defined. |
Comments 1
Comments are closed.